1. Sign in on the computer closest to the printer. The same one I use. Do your image editing in Photoshop.
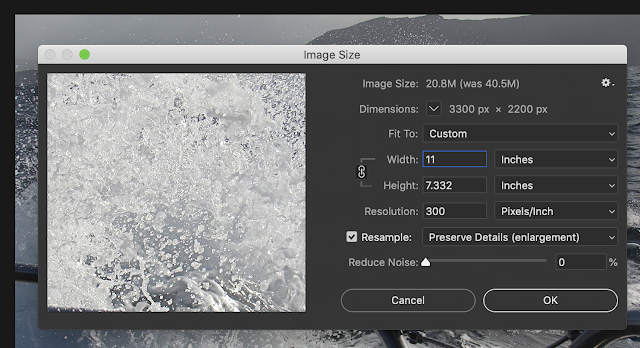
2. If resizing to fit your image on paper, you may do so automatically in the print dialog box. If you chose to do it in Photoshop, please make sure to use a resolution of 220-300 ppi if possible, without upsizing the overall resolution or file size.
3. Go to file - Print. Select the Epson Sylus 7880 Printer. Make sure you select the right printer or the rest of this will not work out the same.
4. Click on print settings to open the printer dialog box. Click on the correct paper size. Underneath that, where it says layout, click on that to pull up the print settings. Select the paper you are using.
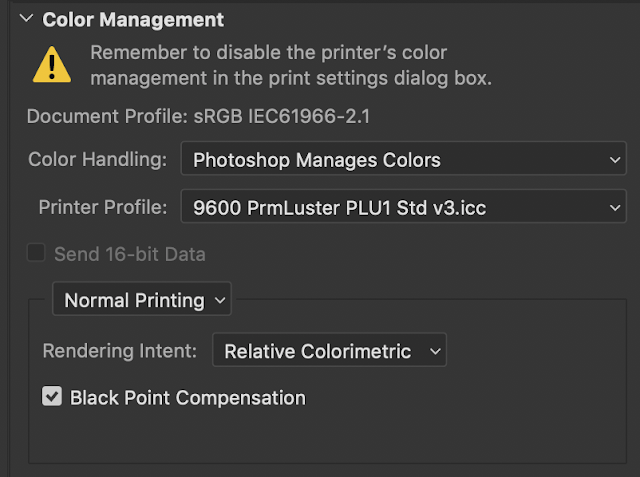
5. Exit out of the print settings, and go back to the Photoshop print window. Where it says color handling. Make sure it says Photoshop Manages Color. Make sure you select the ICC profile that corresponds to your paper. This will make it so your print matches what you see on screen (as close as possible).
Tuesday, November 19, 2019
Paper Buying Guide
Epson Photo Paper Glossy
What you get at the store, servicable quality
Epson Ultra Photo Paper Glossy
Thicker, heavier paper stock, feels better in hands
Epson Ultra Photo Paper Luster
A semi glass with a textured finish, my goto value paper
Epson Ultra Paper Premium Matte
Zero gloss, but the color gamut of the below matte papers are better
Epson Hot Press Paper
Cotton based paper with matte finish, very heavy, good color gamut. Hot press means it is super smooth. Paper color is slightly warmer. Great for nature and landscape.
Epson Cold Press Paper
like above but with a more textured matte finish
Epson Velvet Fine Art Paper
Cotton based paper with matte finish with a watercolor paper- type texture
Epson Exhibition Fiber Based Paper
Very heavy, fiber based paper, resembles darkroom style photographic prints, great for exhibitions, deep blacks and subtle tonal gradations make this the best paper for black and white. Also good for portraits.
Third Party brands I support
Red River Metallic Paper
a high gloss finish and a pearlescent base stock that yields an elegant iridescence in your images. Great for images of archetecure, cars, and other high contrast images.
Red River Baryta
Kind of like a semigloss version of the Epson Fiber paper, better suited for color printing with a warm white paper color.
Red River Canvas Paper
If you want that painterly look
more options from Red River Paper
Hanemuhle makes probably the best, thickest, most premium paper out there. If I were going into a museum or new york gallery, I might splurge on this stuff.
Tuesday, November 5, 2019
Schedule for rest of term
11/7 - studio demo/ abstracts due at end of day
11/12 studio work time
11/14 studio work time
11/19 one/one crits/printing and mounting demo/
11/21 sheena wet plate collodion demo
11/26 final work time
12/3 final work time
Final Project
For your final project consider these 3 options. ...
Create a series of works that represent a new idea, or represents a theme related to your senior exhibition. (Seniors taking Senior Portfolio in the spring must take this option)
or option 2
Create more work based on an idea that you developed in one of the earlier projects.
or option 3
Develop a series based around a topic from the class text, or another topic we haven't approached in class already.
then, this will be the order of assignment deadlines....
Step 1: Proposal
You will need to turn in a one page written proposal for this project, that is due at the end of the day Thursday 11/7. In your proposal I want you to reference two artists whose work you used for inspiration for your idea. You may get your research from the class text, or Lensculture, one of the two. You can use others but only as extra sources. (50 points)
Step 2: Check ups
We will meet for a one on one for check up critiques on 11/19 (50 points)
Step 3: Crit
images due at the beginning of class Friday Dec 6th. You will exhibit a series of 5 images, we will crit them in class.
Email to me your Lightroom contact sheet PDF of all the images shot for this assignment (minimum 150), and I also want all the original PSD files for the Final images. (200 points)
Step 4: Exhibition
We will be meeting on Friday December 6th from 8am-10am (Designated Final Exam Time). We will go over printing and mounting works for the Hallway Gallery Exhibition. Each student may print 1-3 images (must be larger than 11x17) and mount, frame, or matte them. Images may come from any part of the class. Must be hanging by end of the day. (100 points)
Project 5 Studio Lighting
You will pair up with a partner (or 2). You have all receive access to the studio in Grant room 240. The assignment is designed to give you practice and experience with basic studio lighting. You will be turning in 5 final images (in photoshop format). You need to have examples of:
1. Split Light: light coming from the side of your subject. With fill
2. Dramatic side light: strong contrasty light from the side. No fill
3. Rembrandt Light: Light creating a small triangle under the eye.
4. Broad Light: Lighting the near or side of the face towards the camera.
5. Butterfly lighting: Causes a shadow line under the nose.
You will receive a demo for each lighting set up on 11/7, and your team can come anytime after that to finish the project. Final images will be reviewed at end of class 11/19.
Reading Assignment Blogpost Chapter 6 - Photography Changes What we Remember -Due 11/12
Which essay from the assigned chapter spoke to your own experience the most? Summarize the main points of the essay and give a personal anecdote that elaborates on why this article spoke to you the most. Which essay made you think about photography in a new way, or spoke to experiences you may not have been as familiar with? Again, summarize the article and explain why this essay has reshaped your ideas about photography. Write your 200 word (minimum) response below. Make sure to put your name in the comment
11/12 Rebecca Ross
11/14 Ezequiel Delgado.
11/12
Subscribe to:
Posts (Atom)